So far the hardest part of grafting tomatoes is getting germination predictably on time and estimating growth patterns so the stems of the scion and rootstock are roughly the same size. The actual graft and post-graft care are straightforward as long as you follow steps to ensure a gradual exposure to normal conditions.
The two rootstock’s that I have tried, Estamino and RST-04-105 tend to take longer to germinate and are more slender than any of the scion I have grown, so I start the rootstock a couple days before the scion. I’ve learned to plant 2-3 seeds per starter pod to ensure that something comes up when it is usable. There have been times that both seeds will come up but more than 10 days apart; it’s completely unpredictable. So my current strategy is to try and start many varieties of scion at the same time, planting double seeds of each and more seeds of rootstock than I will inevitably use to ensure a higher probability of a correct pairing of stem size when the time comes to graft. You will have to experiment with the rootstock you choose and your environment on how long it takes to germinate.
Another strategy for dealing with the diameter discrepancy’s is to always start rootstock well before the scion is planted, and cut off the top of the rootstock above the cotyledons (and cut them off as well) when it reaches the perfect diameter and then let the scion catch up in growth. Lopping off the top of the rootstock forces the rootstock to attempt to start new growth before it can start growing in diameter again. Within a few days you will notice new growth out of the area of the former cotyledons. You can easily rub this new growth off with your fingers if the scion still isn’t ready. The rootstock stem will be viable for grafting as long as there is healthy tissue where you will be make the grafting cuts (this is why you make the cut above the cotyledons, and not around the grafting area).
Most videos I watched that covered tomato grafting wanted the cuts to be below the cotyledon of the rootstock so no new growth with the rootstock genetic will grow and take energy from the main plant. That may be practical for a large scale operation where plants can’t be monitored, but for amateurs it doesn’t matter. If the rootstock’s stem is a better match for the scion above the cotyledon, then that’s where the cuts should go, and if you get growth from the rootstock at any point in your grafted plants lifecycle, you can cut it off – or not – if you want to try and get tomatoes for rootstock seed off that growth, then go for it (as long as your rootstock doesn’t have legal licenses limiting you from doing that).
For grafting you need the following:
-
Silicone grafting clips
-
Double edged razor blades
-
Fine mist spray bottle
-
Rubbing alcohol
- A moisture impermeable container that blocks light large enough to let the plants heal and a small container of water to sit inside
- Another container that is light permeable but holds in moisture large enough for the seedlings and water to sit inside
Make sure the seedlings are ready for grafting by placing the grafting clip around the stem where you think you might make the graft, if it can slide around, wait a couple more days and test the size again. Sizing of the stem is very important for the success of the graft. Where you decide to make the cut, the stems should not abruptly change in size for at least 2cm. If the clip doesn’t exert equal pressure all along the stem it touches, it may push one side of the plant out of contact with the other when you join them in the clip.
To prepare the two seedlings for the procedure, remove all but the topmost leaves on the scion and cut it off at the base next to the soil. For the rootstock, chop the top off and remove all other leaves.
 Lay the rootstock and scion onto their sides, and put something under the stems for a cutting surface. Bring the stems together so they are sitting flat on an elevated surface and adjust their position until the stems are of equal size where an appropriate cut can be made in each. The trimming and cuts from the previous step will allow them to be flush against each other for a perfectly symmetrical cut angle.
Sterilize the razor blade with the alcohol (especially if it has been used before on other plants). Position the razor blade around a 65-75 degree angle and make a slicing motion through each at the same time. Make sure the motion is a slicing motion and not a chopping one. The blades are sharp, but the less damage done on a micro level means it can heal together faster and easier.

Place the grafting clip over the top of the rootstock until it is halfway down. Examine the angle and orient the scion so the angle matches up precisely with the rootstock, and insert it into the top of the clip. Examine the joint closely to make sure there is good contact all around. I use a jeweler’s loupe to really make sure the joint is perfect. A tiny gap in one part may be okay if you can’t get 100% contact, but since we made cuts where the stems are identical in size at precise angles, it might be a matter of slightly rotating it
At this point you’ll want to spray the grafted plant with water. The only thing keeping the scion from shriveling up will be humidity in the air, and moisture on its leaves. If it dries up, the graft fails. Make sure the joint is not disturbed while moisturizing it. I usually spray the water onto my hand above the plant so the remaining mist can slowly fall onto the leaves. The less top heavy the scion is, the less likely it will disturb the joint if the seedling is jostled. From this point until it is completely healed, it shouldn’t be exposed to much movement. Based on the pressure of the clip, and any sizing differences, they might try to separate on their own, so check and recheck the joint to make sure it is stable until you set it up in the healing chamber.
For 3 days straight the plant needs complete darkness, and humidity to survive and start healing. For humidity, I put a 1/4 cup of boiling water into a small cup or ramekin and place it next to the tomatoes. I use a large stainless steel pot as the initial healing chamber and place it over the top of the plants. We’re not trying to steam the plant until it is cooked, we are merely trying to get 100% humidity in a fast and easy manner, so go easy on the quantity of hot water. The standing water will be enough to maintain humidity. Even do a test in an empty healing chamber to see how warm it gets in a few minutes based on the quantity of water and the temperature it is heated to. The temperature in the healing chamber will warm a few degrees, that’s okay as long as it is not for an extended period of time. Also make sure the healing chamber is not somewhere it can be heated by other sources (direct sun, heating vents, kitchens, etc…).
It is okay to take a super quick peek inside every hour for 3 hours to make sure that there is no wilting or drooping and then leave them alone until the next night. Just a tiny peek though, we don’t want to disturb the humidity levels much.
The next night take the cover off completely, we want to change the air completely. Moisten the leaves with your water mister, refresh the water in your cup with new boiling water, and then cover them up again.
On the third night, I get rid of the pot, and replace it with a small styrofoam cooler which allows some light inside, but it is very diffuse. I cover that with a black towel but in a way to allows a very small amount of light to get inside to the plants. Each night for 4 nights the towel covers less and less of the cooler until it is not covering it at all on the 7th night. Likewise the humidity is decreased gradually as well. This is accomplished by using 1/4 cup of boiling water at first but gradually introducing cooler water until the 4th night where it is room temperature. Just like the first 3 nights, the coverings should be removed completely for fresh air to replace the stale air. Misting is likewise reduced over this time when the air is changed.
So a week has passed and over two days we need to gradually open up the protected environment to normal conditions. If the graft has worked, and the rootstock is supplying the scion with water pressure, there should be no wilting with humidity removed, just make sure the growing medium is moist. With the cooler propped open a little bit, check in every hour for changes, and if there is any wilting, check the graft joint for gaps, if there is one, it might be a failure; you can try to give it a misting, humidity and a sealed healing chamber, but it might be a loss. If not, gradually open it up some more and repeat.
If all is well, gradually expose it to full sun in the same, slow, gradual manner. After it shows signs of growing in a few more days you can expose it to light wind to strengthen it up, but go easy. Once it is hardened off and growing the grafted seedling should be stronger than a regular seedling in every sense and won’t require any other special care.
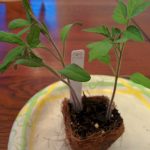
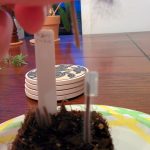
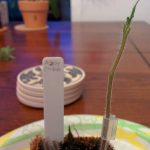
You should leave the grafting clip in place and let it fall off on its own when the plant is large enough for that to happen.
After all this, make sure to keep the graft joint as much above soil level as possible when you plant it, and never get much water onto the scion so it won’t develop roots, otherwise your scion might pick up a disease from the soil, which is probably why you went to the trouble of grafting in the first place.